Wednesday, May 23, 2012

Another Jamie Oliver Delight!

I have said it before, and I will say it again -Jamie Oliver is amazing. I strongly feel as though his recipes are under appreciated and seldom made, despite how outstanding they are. As of late, I made Jamie's "Italian Bread and Cabbage Soup with Sage Butter" which I saw on his show last year. I fell in love with the unusual preparations and ingredients used in the soup, and didn't get to trying it until just this weekend.

I will admit, I was not completely at ease when making this recipe. The cabbage and kale in the soup is boiled for a few moments in stock. Later on in the recipe, that very same stock is used again as the soup base. However, as I stared into the Dutch oven full of steaming "cabbage broth," I couldn't help but think that I ultimately might be having something else for dinner that night. I proceeded with the recipe though. The sautéed pancetta and anchovies made me feel a little better as a I went along, and the addition of the cheese between the layers of bread and cabbage provided even more hope for this dish. I popped the soup into the oven and sat back while dreading the insipid broth and soggy bread that I anticipated this recipe to have.


As you may already have guessed, I wouldn't be writing about this recipe had it not been even moderately good. In actuality, it was the best thing I ever made. I pulled the soup out of the oven, and to my surprise, the soup was golden brown and crisp on the top...very good sign. I then spooned into the soup to find that it almost resembled a very moist bread pudding. As the recipe described in my "Jamie at Home" book, the soup was more along the lines of an English Bread and Butter Pudding. Well, Bread and Butter Pudding or not, this was delicious! With our soup bowls on our bellies, my mother and I chowed down on this decadent soup. We looked at each other, and our eyes rolled back into our heads. The cabbage still had great texture hence the preparation, and the bread combined with the cheese was like silk.

Anyway, I have gone on enough about how GREAT this soup is! Now it is up to you to make it...

Italian Bread and Cabbage Soup with Sage Butter

Ingredients

  • 3 quarts good-quality chicken or vegetable stock
  • 1 Savoy cabbage, stalks removed, outer leaves separated, washed and roughly chopped
  • 2 big handfuls cavolo nero and/or kale, stalks removed, leaves washed
  • and roughly chopped
  • About 16 slices stale country-style or sourdough bread
  • 1 clove garlic, unpeeled, cut in 1/2
  • Olive oil
  • 12 to 14 slices pancetta or bacon
  • 1 (4-ounce) can anchovy fillets, in oil
  • 3 sprigs fresh rosemary, leaves picked
  • 7 ounces fontina cheese, grated
  • 5 ounces freshly grated Parmesan, plus a little for serving
  • Sea salt and freshly ground black pepper
  • Couple large knobs butter
  • Small bunch fresh sage, leaves picked

Directions

Preheat your oven to 350 degrees F.

Bring the stock to the boil in a large saucepan and add the cabbage, cavolo nero and/or kale. Cook for a few minutes until softened (you may have to do this in 2 batches). Remove the cabbage to a large bowl, leaving the stock in the pan.

Toast all but 5 of the bread slices on a hot griddle pan or in a toaster, then rub them on 1 side with the garlic halves, and set aside.

Next, heat a large 4-inch-deep ovenproof casserole-type pan on the stove top, pour in a couple of glugs of olive oil and add your pancetta and anchovies. When the pancetta is golden brown and sizzling, add the rosemary and cooked cabbage and toss to coat the greens in all the lovely flavors. Put the mixture and all the juices back into the large bowl.

Place 4 of the toasted slices in the casserole-type pan, in 1 layer. Spread over 1/3 of the cabbage leaves, sprinkle over a 1/4 of the grated fontina and Parmesan and add a drizzle of olive oil. Repeat this twice, but don't stress if your pan's only big enough to take layers - that's fine. Just pour in all the juices remaining in the bowl and end with a layer of untoasted bread on top. Push down on the layers with your hands.

Pour the stock gently over the top until it just comes up to the top layer. Push down again and sprinkle over the remaining fontina and Parmesan. Add a good pinch of salt and pepper and drizzle over some good-quality olive oil. Bake in the preheated oven for around 30 minutes, or until crispy and golden on top.

When the soup is ready, divide it between your bowls. Melt the butter in a frying pan and quickly fry the sage leaves until they're just crisp and the butter is lightly golden (not burned!). Spoon a bit of the flavored butter and sage leaves over the soup and add another grating of Parmesan. Such a great combo!

Courtesy of Jamie Oliver and Food Network

Friday, April 6, 2012

A Diet Delight: Strawberry-Rhubarb Sauce

Rhubarb and strawberries are two of my favorite Spring ingredients. Rhubarb, being a vegetable can be used in a savory or sweet format, and strawberries have endless possibilities. My most favorite way to utilize these fresh finds, is in my Strawberry-Rhubarb Sauce. Perfect for a warm Spring evening or in a breakfast parfait, Strawberry-Rhubarb Sauce will not only put a smile on your face, but it will also leave your body happy too, for it is a diet delight! Read on for the recipe...

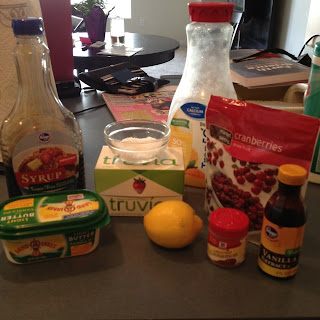
Ingredients

-Strawberries, hulled and washed
-Rhubarb, trimmed and sliced
-3 packets Truvia
-3 Tablespoons Sugar Free Maple Syrup
-2 Tablespoons Trop50 Low Calorie Orange Juice -or- Regular Orange Juice
-3/4 teaspoon ground cinnamon
-1 teaspoon vanilla extract -or- maple extract
-1 Tablespoon dried cranberries
-1 teaspoon Land O' Lakes Light Butter -or- other light butter (optional)
-Pinch of Salt
-1 lemon, juiced


I don't really measure my berries or my rhubarb. I usually just use whatever I have and try to maintain a good ratio of both. I begin by hulling them, and then washing them gently. (pictured above)


Next, I cut them into large slices. I like to keep my berries and rhubarb quite large, so they don't resemble apple sauce consistency after I cook them. The proper thickness can be viewed above.

I then slice the rhubarb into large chunks (pictured above). Rhubarb frays when it is cooked, so therefore I like to keep it on the larger side, in order to maintain its integrity.

I combine all of my rhubarb and strawberries in a medium saucepan, and add the pantry/fridge ingredients. (pictured below)


 After combining all of my pantry/fridge ingredients with the strawberries and rhubarb, I give the mixture a good stir (pictured above), just before I turn the stove onto medium-high.

Once you have the berry mixture on the heat, I allow the mixture to come to a steady boil. At this point, you will want to stir the mixture every few minutes, so it doesn't stick and/or burn. (pictured below)


Once my berry mixture is brought to a steady gallop, I reduce the pot to a simmer. Upon arriving at this stage, you should still stir the pot every now and then, but the berries are quite alright stewing on their own at a simmer. (pictured above)

You should only have to stew this mixture for ten to fifteen minutes until it is softened and has developed a nice viscosity. (pictured below)

You don't want to take your mixture too far, but really it is all about preference. I prefer my berries and rhubarb to still hold their shape. (pictured above)

Once the sauce has reached your desired consistency, you can leave it in the pot to cool. While cooling, it will thicken slightly, and even more so once it is put in the fridge.

This sauce is really simple and almost foolproof. You can alter it or serve it however you like. I enjoy mine with a dollop of unsweetened Greek Yogurt, or even plain. Nonetheless, this is a wonderful low-calorie treat that will satisfy the sweet-tooth in all of us.

Happy Spring!

Sunday, February 5, 2012

A Game Day Feast

Although some may disagree, Super Bowl Sunday is in many ways, just an excuse to eat. The actual game is an emotional vehicle for a party. I for one, am not interested in the sports aspect at all, and utilized the day to make a feast of Super Bowl classics with a healthy twist. There was oven-fried chicken with a light honey-mustard sauce, "classic" coleslaw, and better-for-you potato skin. Of course, I couldn't help myself, there were Ina Garten's "Outrageous Brownies" to top the night off, and satisfy one's sweet tooth, but who's to condemn that? I am one not to skimp on holidays, but I thoroughly enjoyed applying my weekday habits to these calorie-laden belly bombs. At the end of the day, team loyalties aside, everyone enjoyed these all-American Super Bowl treats, and at least I pretended to know what a field goal was... 

Keep reading for recipes and comments! Below, are my two favorites...


This chicken brought me back to my childhood love of "Chicken Fingers and Fries." These are just as good as the greasy kids-menu ones, but much better for you. I also used chicken breasts instead of thighs.


Honey-Crisp Oven-Fried Chicken
Courtesy of Ellie Krieger (Source: Fine Cooking)


4 skinless, bone-in chicken thighs (about 1 ½ pounds)
2/3 cup low-fat buttermilk
4 cups corn flake cereal
½ teaspoon paprika
½ teaspoon garlic powder
½ teaspoon salt
¼ teaspoon freshly ground black pepper
¼ teaspoon cayenne pepper
Olive oil cooking spray
2 tablespoons honey

Place the chicken in a bowl with the buttermilk and toss to coat. Marinate in the refrigerator for at least one hour and up to four hours.

Place the corn flakes in a food processor and process until crumbs are formed (You should have about 1 cup of crumbs). Transfer to a shallow dish and mix in the paprika, garlic powder, salt, black pepper and cayenne.

Preheat the oven to 350 degrees. Spray a baking sheet with olive oil spray.

Remove chicken from buttermilk, shaking off excess buttermilk from the chicken. Discard the remaining buttermilk. Brush each piece of chicken with honey, then dip in the corn flake crumbs, pressing hard so crumbs adhere to chicken. Spray a cookie sheet with olive oil spray and place coated chicken on sheet. Spray each piece lightly on top with olive oil spray. Bake until chicken is crisp and meat cooked through, 45-50 minutes.


Not being a huge fan of the potato skin, I enjoyed these immensely, seeing that they used a few of my favorite ingredients such as avocados, and greek yogurt. 


Daphne Oz's Super Bowl® Potato Skins
Courtesy of: Daphne Oz (Source: The Chew)


  • 6 Idaho Potatoes (I used baby reds.)
  • 1 cup Mexican Blend Shredded Cheese 
  • 1 cup Avocado (cubed and tossed in lime juice)
  • 1 cup Pico de Gallo
  • 1 cup Greek Yogurt
  • 3 tablespoon Olive Oil
  • Sea Salt
  • Freshly Ground Pepper
  • 1 jalapeno (sliced)


Preheat oven to 350F. Roast potatoes for 1 hour and let cool to touch. Half and scoop out 3/4 of the centers.


Preheat broiler. Drizzle the halves with olive oil. Top with cheese and put under the broiler for an additional 2-3 minutes to melt cheese and crisp skins.

Fill halves with pico de gallo, avocado, jalapenos and more cheese. Pop under the broiler again to melt the cheese. Garnish with greek yogurt, and season with salt and pepper to taste.
           
Both of these recipes went into my recipe book tonight. Even my father, who detests anything with the word "organic" or "diet" attached to it, loved these dishes and raved over them. All of this being said, I hope everyone enjoyed their evening of football and family. I sure enjoyed mine, even though it was spent in the kitchen rather than on the couch. Can I get a "Go team"!?!

Saturday, January 21, 2012

A Forgotten Gem

When I think about the many successful desserts that I made prior to starting this blog, I debate whether or not it would be valid to write about them. Although I am proud of a multitude of them, there are only a handful that I feel are worthy to write about. That being said, I am rewinding all the way back to Christmas Day, where I made a Semifreddo. I had made a Semifreddo before, and fell IN LOVE with the texture, and versatility of flavor pairings. This recipe, came from an old Gourmet magazine from June of 2008. Although I usually try not to serve any form of frozen, or ice-cream dessert in the winter, I felt unable to help myself with this. The dessert is titled "Stracciatella Cake with Espresso Fudge Sauce". After a ham, and the most wonderful vegetables bathed and roasted in the ham's decadent juices, this dessert topped of the lovely Christmas meal.

I decided to start this dessert two days early, so that I could thoroughly freeze the cake, and have time to leisurely prepare my Christmas Day dessert. I couldn't find amaretti cookies anywhere in my area, so for the crust of the cake, I used anise flavored biscotti which worked beautifully. For the frozen part, it is a decadent emulsion of eggs, sugar, chocolate, and cream. The crust is packed into a loaf pan, and draped with the filling. The dessert has to freeze for quite sometime, but never manages to get hard like ice cream. Instead, the filling is lusciously creamy, and the crust crunchy, and distinct in flavor. The dessert is served with the most rich, and thick espresso fudge sauce. The warm sauce, which is slightly bitter and not too sweet, contrasts greatly with the cool semifreddo.

This dessert is wonderful all year round, but especially striking for special occasions. It is also easily plated, and appears effortlessly elegant. Despite the fact that I made this quite some time ago, I couldn't bear not to mention it, because it is truly a classic.


Tuesday, September 6, 2011

Au Revoir Summer! - Blackberry and Apple Pie

Summer has never really been one of my favorite times of the year. Strawberries, tomatoes, and asparagus can only tease one's palate for so long in my opinion. Yes, root vegetables, braises, and cream laden sauces are way more up my alley than the latter. So, when we had company last week, I confirmed that this would be my last Summer themed dessert. After that, it was apples, pears, cinnamon, and full-throttle comfort food all the way. This last homage to Summer had to be a good one though, and that it was. I chose Jamie Oliver's "Blackberry and Apple Pie". Jamie, who is almost never bad, made this dessert on his show, and I couldn't take my mind off of it. The pie is simply filled with apples, blackberries, sugar, and stem ginger, which is simmered until the apples are soft. Jamie also promises a foolproof Shortcrust pastry, which it was. I have never made a crust so flawless and flaky, and I will never use another recipe. What made the pie so original and irresistible was the custard sauce that accompanied it. I served the pie with the lovely crimson juices, spilling all over a luxurious English vanilla custard sauce. The custard was a Jamie recipe as well. All of that being said, the pie was a huge hit at the dinner party and it will be made again. Here's the evidence...


Here the pie is, with its lovely blanket of pastry atop it. I had never done this sort of pie before so the task was daunting. Jamie promised that if you listened to his instructions though, all would be well. Truer words have never been spoken!


The pie also has a dusting of sugar and cinnamon, which gave it those golden brown speckles, and lovely added flavor.


Here the pie is, ready to be served, surrounded by a pool of custard sauce. What is not to like?


Well, this little "good bye" to Summer, was well worth it, and let me rest easy, that I gave it a proper good bye. That being said though, I am ready for fall, and the next time you see me, it will probably be sweet potato-this, and cinnamon-that! Here is the pie recipe, but the custard and pastry recipe can be found elsewhere on the Internet...

Courtesy of Jamie Oliver:


Blackberry and Apple Pie
 
Ingredients

• 1 x sweet shortcrust pastry
recipe
• ¼ cup butter, plus
extra for greasing
• 1⁄3 cup raw sugar, plus
extra for sprinkling
• 2 large Bramley or
McIntosh apples,
cored, peeled and each
cut into 16 wedges
• 4 Cox, Empire or
Granny Smith apples,
cored, peeled and each
cut into 8 wedges
• 1 heaped tablespoon
chopped ginger,
in syrup
• 5 ounces blackberries
• 1 large free-range or
organic egg, beaten
• ½ teaspoon ground
cinnamon
 
 
Method

First, make your pastry dough, wrap it in plastic wrap and
rest it in the fridge for at least half an hour. Then preheat
the oven to 350°F. Put the butter and sugar into a saucepan
and, when the butter has melted, add the apples, ginger and
a tablespoon of the ginger syrup. Slowly cook for 15 minutes
with a lid on, then add the blackberries, stir and cook for 5
more minutes with the lid off.

Meanwhile, remove your pastry from the fridge. Dust your
work surface with flour, cut the pastry in half and, using a
floured rolling pin, roll one of the pieces out until it’s just under
½-inch thick. (Rolling the dough between two layers of waxed
paper will also stop it sticking to your rolling pin.) Butter a
shallow 10-inch pie dish and line with the pastry, trimming off
any excess round the edges using a sharp knife.

Tip the cooled apples and blackberries into a sieve, reserving all
the juices, then put the fruit into the lined pie dish so you have a
mound in the middle. Spoon over half the reserved juices. Brush
the edge of the pastry with beaten egg. Roll out the second piece
of pastry, just as you did the first, and lay it over the top of
the pie. Trim the edges as before and crimp them together with
your fingers. Brush the top of the pie with the rest of the beaten
egg, sprinkle generously with sugar and the cinnamon, and
make a couple of slashes in the top of the pastry.

Place the pie on a baking tray and then put it directly on the
bottom of the preheated oven for 55 to 60 minutes, until golden
brown and crisp. To serve, slice the pie into portions and serve
with a generous dollop of ice-cream.

Thursday, September 1, 2011

La Petite Gastronome: Crack Really Is Whack...

La Petite Gastronome: Crack Really Is Whack...: Well, for quite sometime now, I have been hearing about Christina Tosi's "Crack Pie". I asked myself, "How amazing can something really be?"...

Tuesday, August 30, 2011

Crack Really Is Whack...

Well, for quite sometime now, I have been hearing about Christina Tosi's "Crack Pie". I asked myself, "How amazing can something really be?" Well, the answer to that is yes, it is really that amazing, but with some strings attached. To start, I would like to say that "Crack Pie" is unbelievably addicting, and GOOD. As my mother and I hovered over the cold pie, with two spoons, eating it exactly as Tosi had instructed, I had a thought; Is "Crack Pie" really addicting per se, or is it just addicting by association? The stereotype of "Crack Pie" is very clear, and I feel as though all of us who know about it, and have eaten it, want it to be truly addicting. Due to this consensus, is crack pie only addicting because we want it to be? Or is it truly addicting, due to the obscene amounts of sugar and butter. Either way, I loved me some "Crack Pie", and it is definitely a force to be reckoned with.

Anyway! Making "Crack Pie" was fun. I thought that the Oat Crust was absolutely genius, and don't know why I hadn't thought of something like that before. Also, the filling had a lot of steps but was very easy. Seeing that the recipe made two pies, I chose to do an original and a Biscoff Spread flavored pie. The original would be for the company, while the Biscoff one would be for my mother and me, naturally. So, I simply divided the filling, and tossed in a 1/3 of a cup of Biscoff Spread into one of the half's, and in they went to the oven. After cooling just slightly, I couldn't help myself, but to try a piping hot bite. Fortunately, there where two, so the company wouldn't notice that I took a large chomp out of the Biscoff one. To be perfectly honest, I liked the chilled version better, which is how the pie is intended to be eaten. Also, both flavors were equally delicious. I thought maybe that the original flavor wouldn't compare to the Biscoff, but both were insanely addicting.

Here is the pie recipe. An remember kids, pie is always better than drugs!

The oat cookie crust-Good on it's own, by the way.

Crack Pie untouched...but not for long.

The civilized way to eat Crack Pie.


Recipe Courtesy of Christina Tosi and Bon Appetit :

Ingredients

Oat Cookie Crust

  • Nonstick vegetable oil spray
  • 9 tablespoons (1 stick plus 1 tablespoon) unsalted butter, room temperature, divided
  • 5 1/2 tablespoons (packed) golden brown sugar, divided
  • 2 tablespoons sugar
  • 1 large egg
  • 3/4 cup plus 2 tablespoons old-fashioned oats
  • 1/2 cup all purpose flour
  • 1/8 teaspoon baking powder
  • 1/8 teaspoon baking soda
  • 1/4 teaspoon (generous) salt

Filling

  • 3/4 cup sugar
  • 1/2 cup (packed) golden brown sugar
  • 1 tablespoon nonfat dry milk powder
  • 1/4 teaspoon salt
  • 1/2 cup (1 stick) unsalted butter, melted, cooled slightly
  • 6 1/2 tablespoons heavy whipping cream
  • 4 large egg yolks
  • 1 teaspoon vanilla extract
  • Powdered sugar (for dusting)

Preparation

Oat Cookie Crust

  • Preheat oven to 350°F. Line 13x9x2-inch metal baking pan with parchment paper; coat with nonstick spray. Combine 6 tablespoons butter, 4 tablespoons brown sugar, and 2 tablespoons sugar in medium bowl. Using electric mixer, beat mixture until light and fluffy, occasionally scraping down sides of bowl, about 2 minutes. Add egg; beat until pale and fluffy. Add oats, flour, baking powder, baking soda, and salt and beat until well blended, about 1 minute. Turn oat mixture out onto prepared baking pan; press out evenly to edges of pan. Bake until light golden on top, 17 to 18 minutes. Transfer baking pan to rack and cool cookie completely.
  • Using hands, crumble oat cookie into large bowl; add 3 tablespoons butter and 1 1/2 tablespoons brown sugar. Rub in with fingertips until mixture is moist enough to stick together. Transfer cookie crust mixture to 9-inch-diameter glass pie dish. Using fingers, press mixture evenly onto bottom and up sides of pie dish. Place pie dish with crust on rimmed baking sheet.

Filling

  • Position rack in center of oven and preheat to 350°F. Whisk both sugars, milk powder, and salt in medium bowl to blend. Add melted butter and whisk until blended. Add cream, then egg yolks and vanilla and whisk until well blended. Pour filling into crust. Bake pie 30 minutes (filling may begin to bubble). Reduce oven temperature to 325°F. Continue to bake pie until filling is brown in spots and set around edges but center still moves slightly when pie dish is gently shaken, about 20 minutes longer. Cool pie 2 hours in pie dish on rack. Chill uncovered overnight. DO AHEAD Can be made 2 days ahead. Cover; keep chilled.
  • Sift powdered sugar lightly over top of pie. Cut pie into wedges and serve cold.